
In this Divi tutorial, we’re going to show you how you can combine row and column background options to create stunning results. By choosing the right combinations and settings, you can achieve designs that enhance the overall look and feel of your website. To demonstrate what we’re talking about, we’ve made an example that we’ll help you build step by step. We’ve created this result by using the Divi built-in options only, so you won’t need to add any additional CSS.
Result
If you follow this tutorial step by step, you’ll be able to achieve the following result:
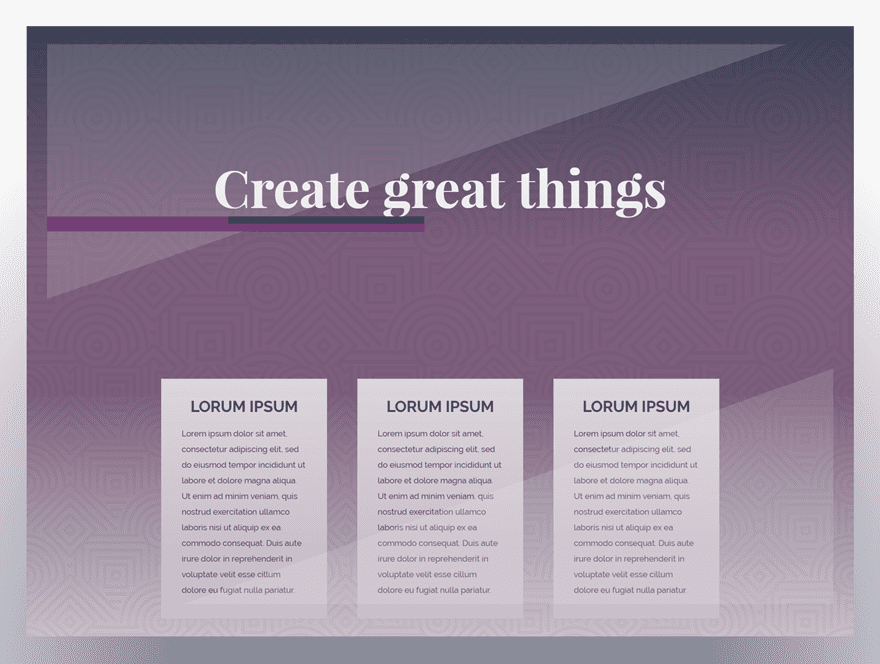
Although we’ve used three different rows to achieve this result, it looks like they’re all part of a bigger picture. Let’s get started!
Switch to Visual Builder
Create a new page and enable the Divi Builder and switch over to the Visual Builder.
Create Section
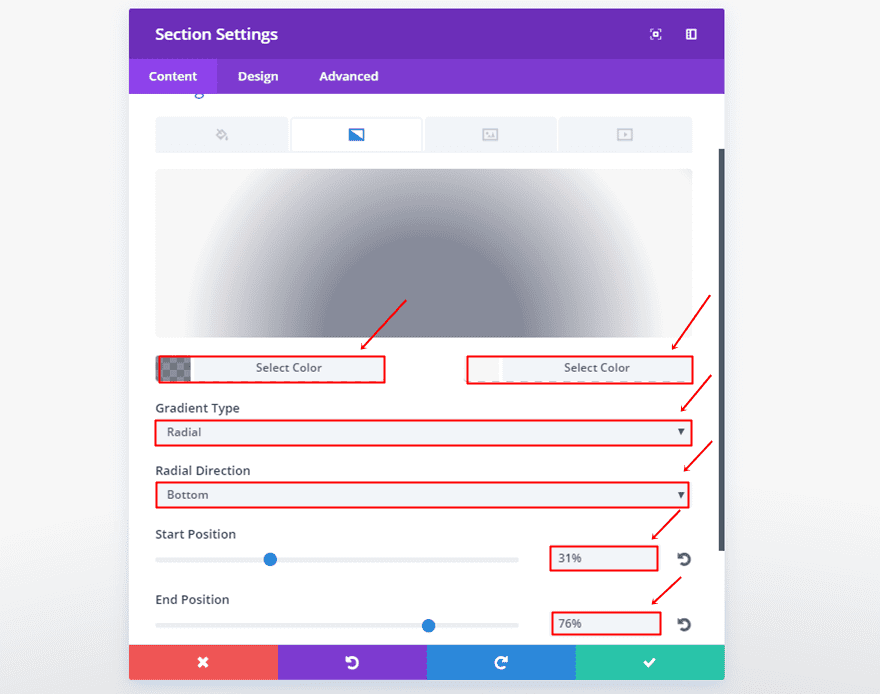
The first thing we’ll need to do is create a new standard section. All the rows we’ll be creating and combining with each other will be part of this section. To create a box shadow effect on the rows, we’ll add the following section gradient background:
- First Color: rgba(61,65,86,0.59)
- Second Color: #f7f7f7
- Gradient Type: Radial
- Radial Direction: Bottom
- Start Position: 31%
- End Position: 76%
Add One-Column Row
The next thing we’ll need to do is add a one-column row to the section. This row will represent the following part of our end result:

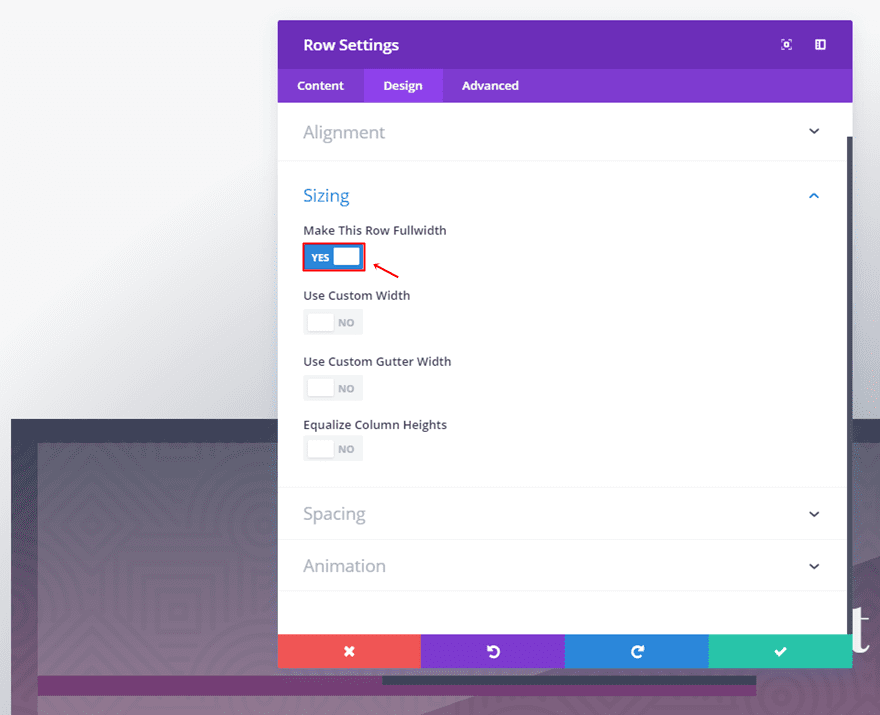
Row & Column Settings
Make Row Fullwidth
Go ahead and make the row fullwidth within the Design tab.
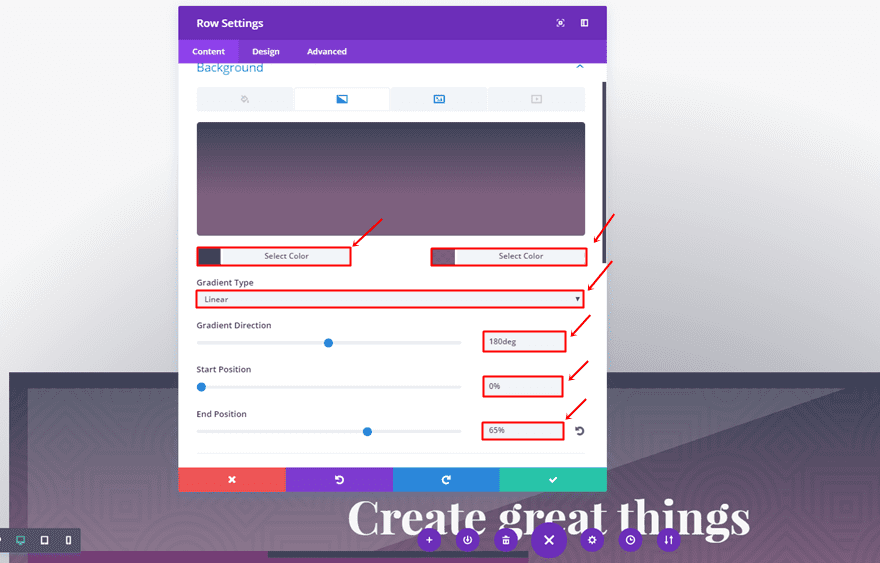
Row Background Settings
Then, you can go back to the Content tab and add the following gradient background:
- First Color: #3d4156
- Second Color: rgba(114,81,114,0.91)
- Gradient Type: Linear
- Gradient Direction: 180deg
- Start Position: 0%
- End Position: 65%
Upload a background image (in this case a pattern) and choose ‘Multiply’ as your Background Image Blend.

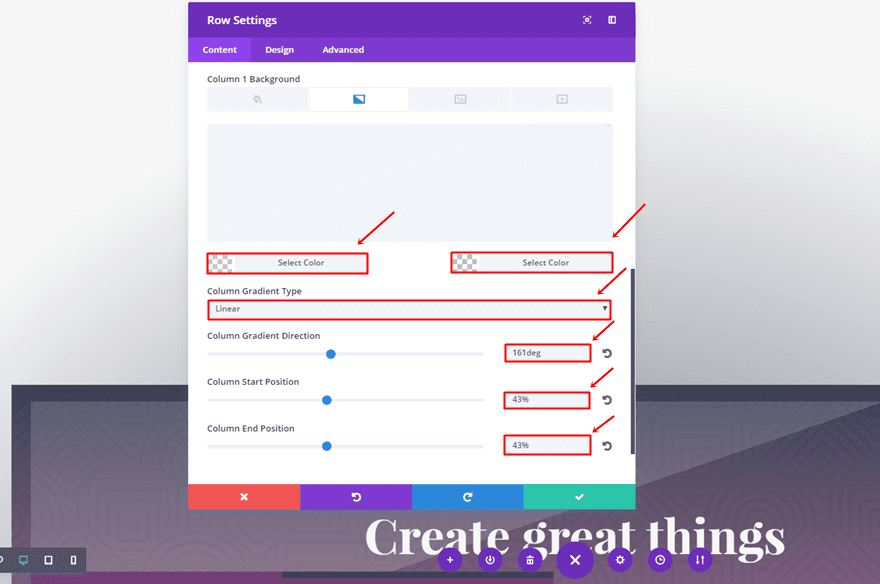
Column Background Settings
Next, scroll down and assign the following gradient background settings to the column of your row:
- First Color: rgba(255,255,255,0.15)
- Second Color: rgba(214,44,104,0)
- Column Gradient Type: Linear
- Column Gradient Direction: 161deg
- Column Start Position: 43%
- Column End Position: 43%
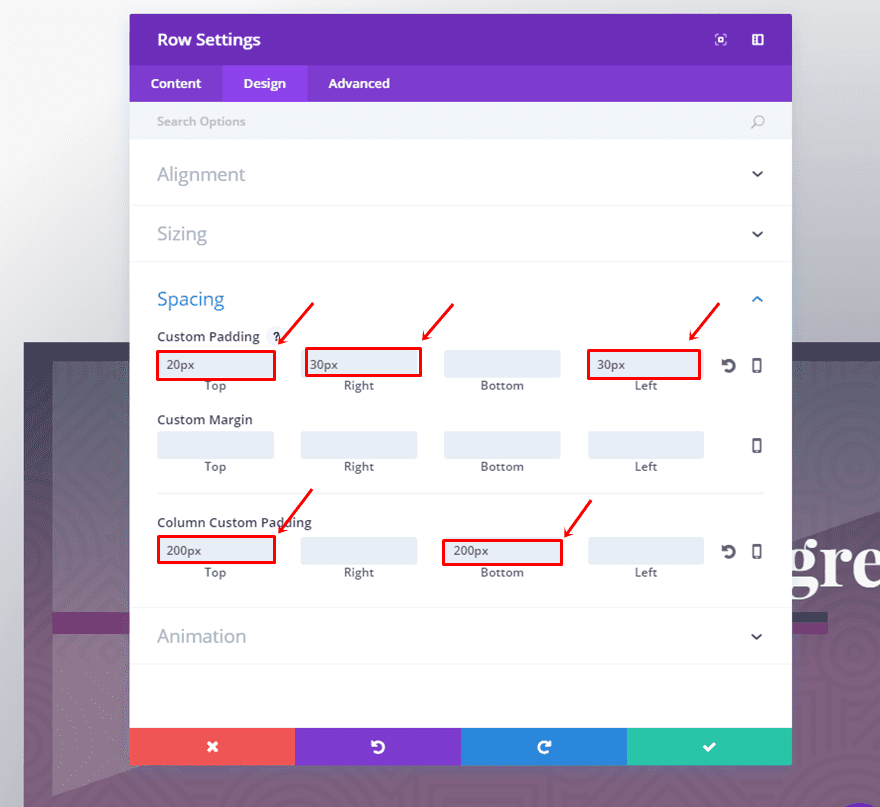
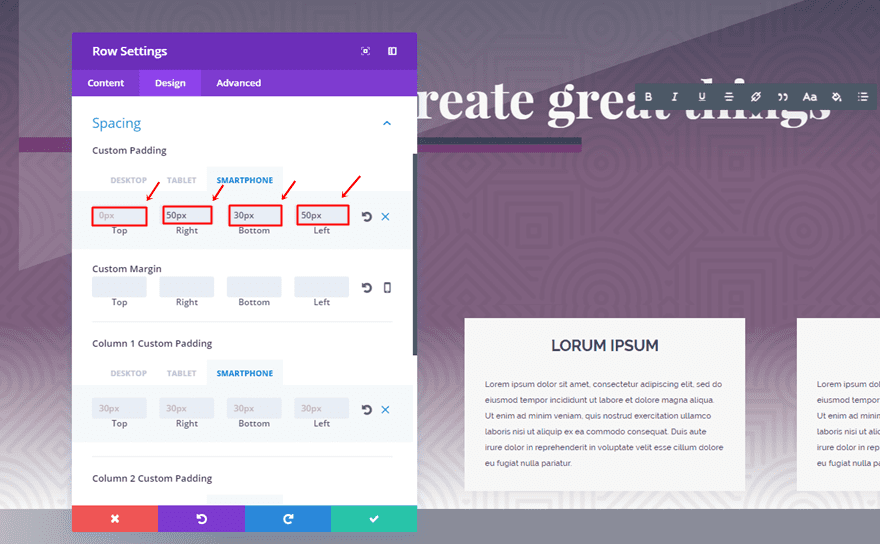
Spacing
Continue by adding the following padding to your row:
- Top: 20px
- Right: 30px
- Left: 30px
And the some padding to your column as well:
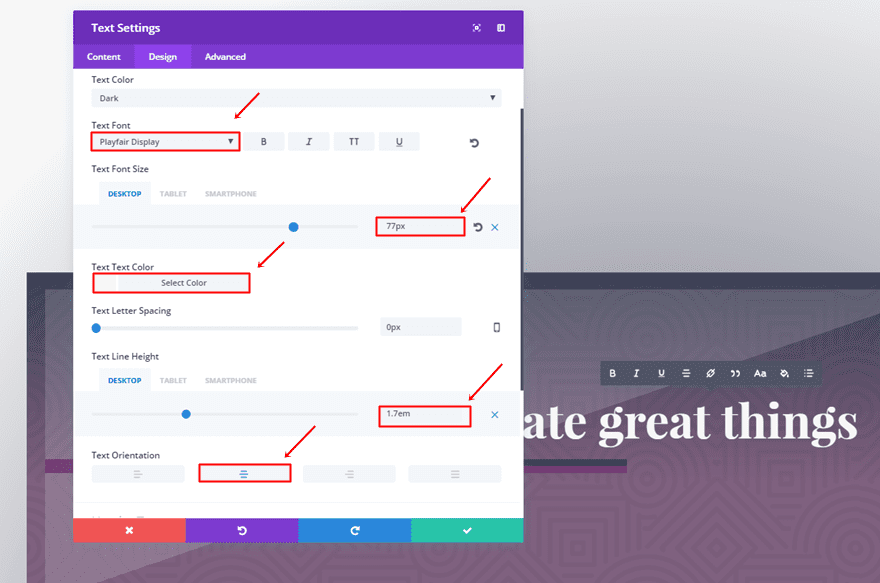
Add Text Module
The next thing we’ll do is add a Text Module to the row and make the following changes to the Text subcategory of that Text Module:
- Text Font: Playfair Display
- Text Font Size: 77px (Desktop), 64 (Tablet), 51 (Phone)
- Text Color: #f7f7f7
- Text Line Height: 1.7 (Desktop), 1em (Tablet & Phone)
Add Divider Module
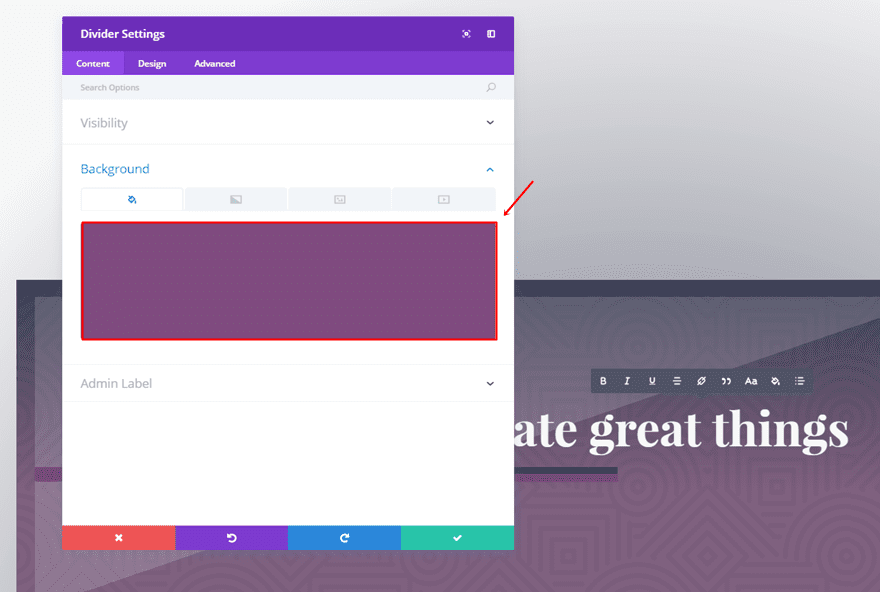
Continue by adding a Divider Module below the Text Module you’ve just created and enable the ‘Show Divider’ option within the Visibility subcategory.
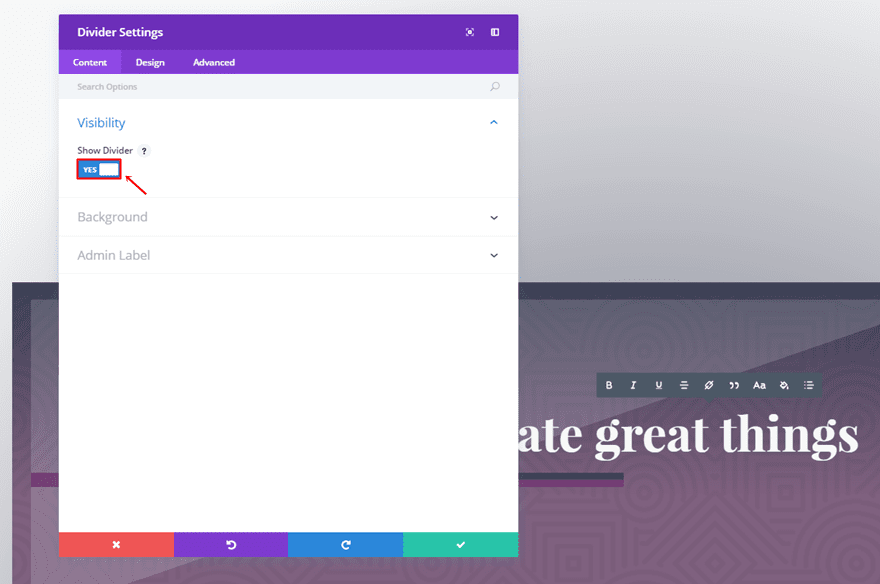
Scroll down that same tab and use ‘rgba(114,57,114,0.91)’ as the background color.
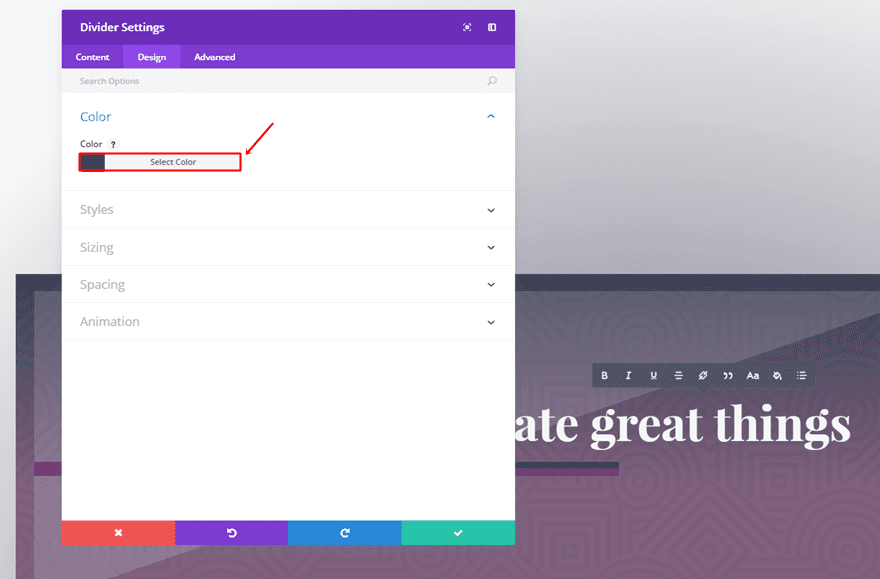
Move on to the Design tab and select ‘#3d4156’ as your divider color.
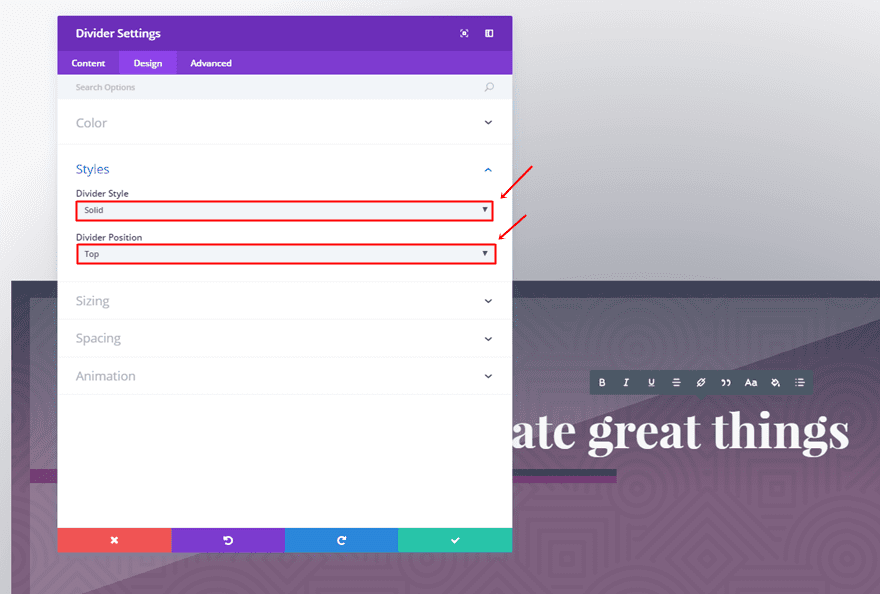
Open the Styles subcategory and use ‘Solid’ as your Divider Style and ‘Top’ as your Divider Position.
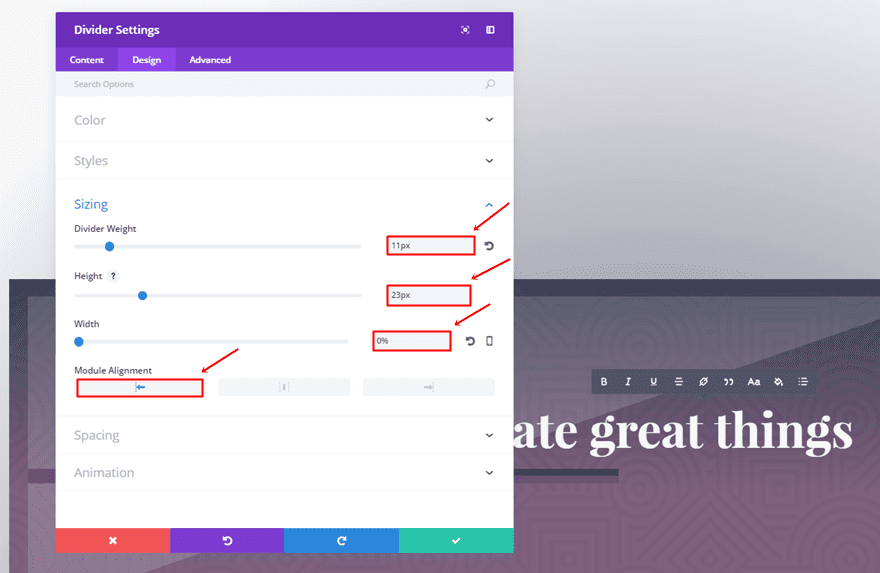
Next, assign the following settings to the Sizing subcategory:
- Divider Weight: 11px
- Height: 23px
- Width: 0%
- Module Alignment: Left
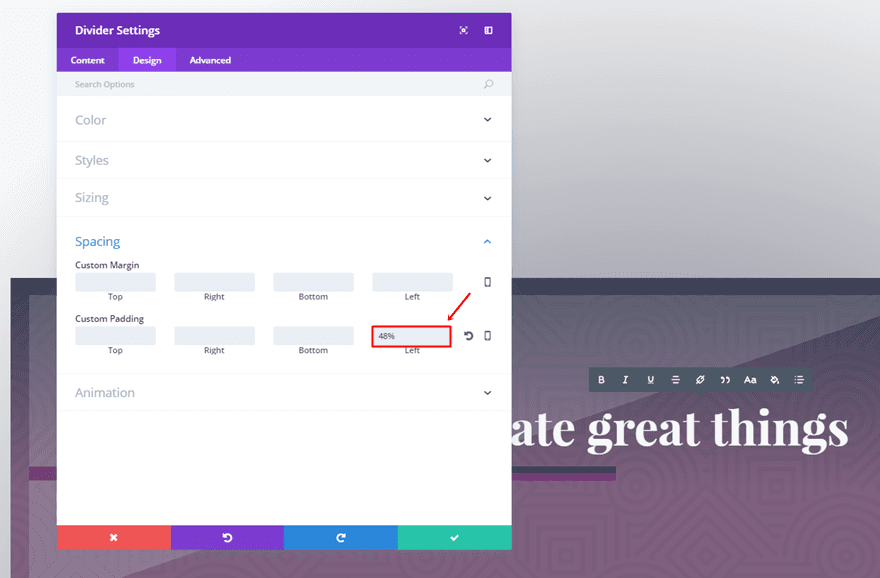
Last but not least, add a left padding of ‘48%’ to the Custom Padding option.
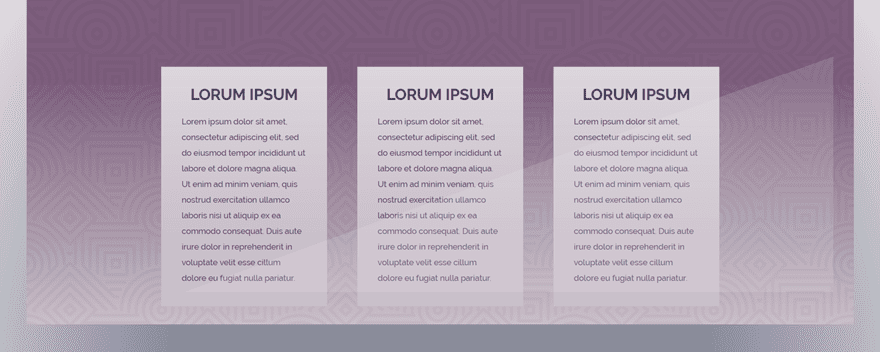
Add Three-Column Row
The next row we’ll be adding to the section looks like an extension of the previous row although they are made separately.
Row & Column Settings
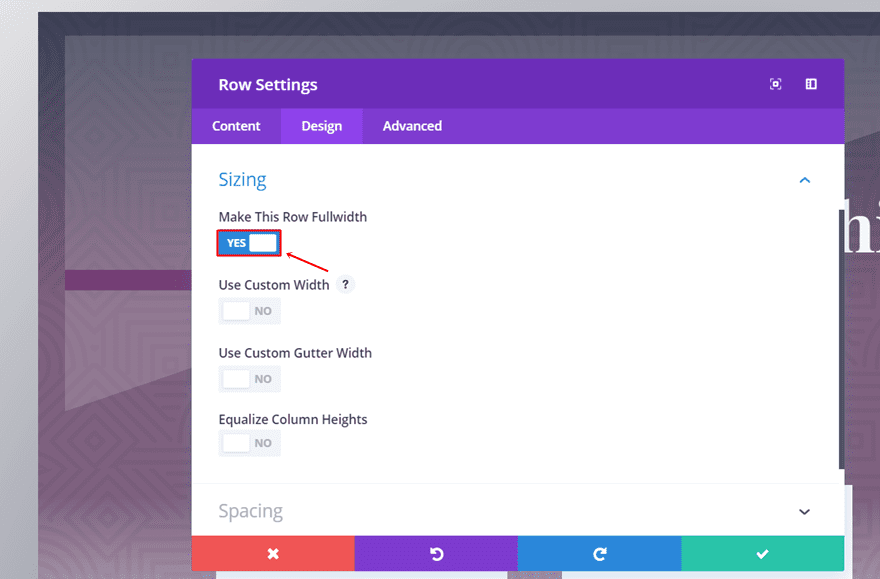
Make Row Fullwidth
Start, again, by making the new row fullwidth.
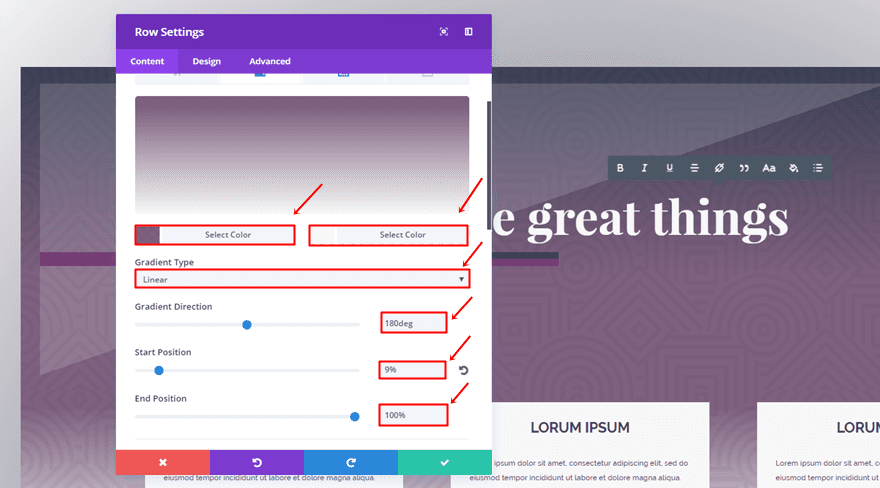
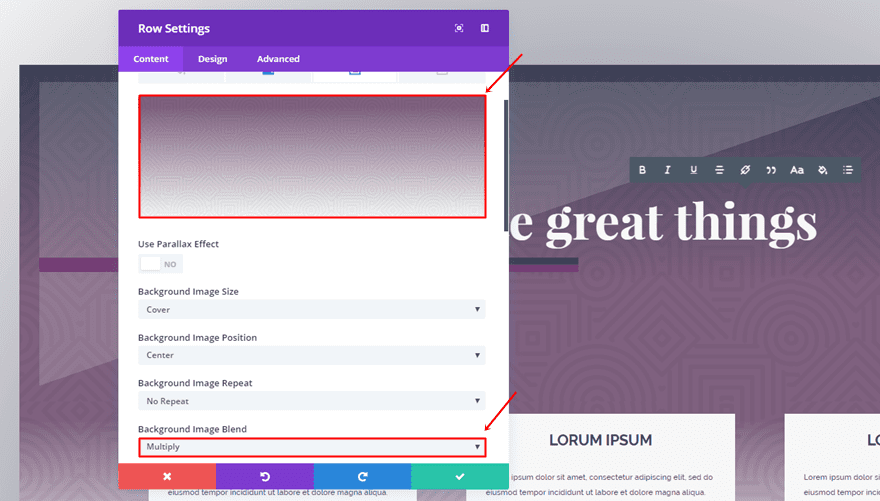
Row Background Settings
Then, use the following background settings:
- First Color: rgba(114,81,114,0.91)
- Second Color: #f7f7f7
- Gradient Type: Linear
- Gradient Direction: 180deg
- Start Position: 9%
- End Position: 100%
Add a background pattern and use ‘Multiply’ as the Background Image Blend.
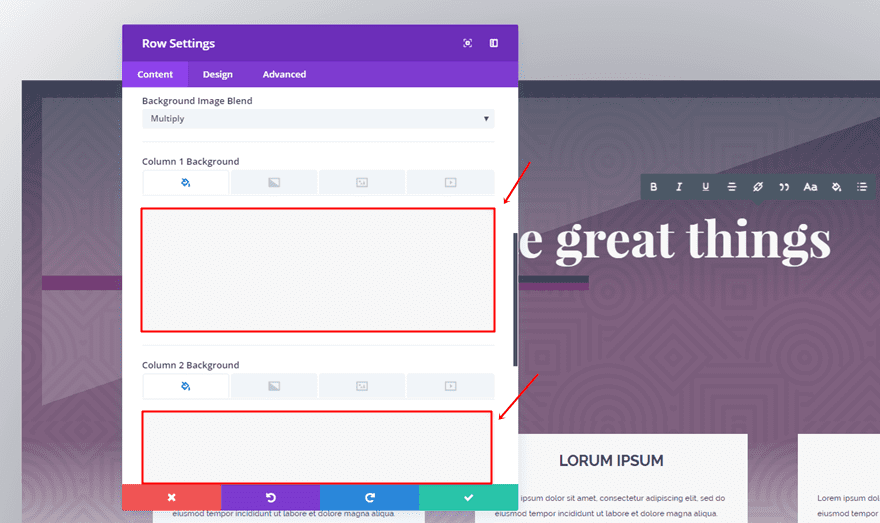
Column Background Settings
Scroll down the tab and use ‘#f7f7f7’ as the background color for each column.
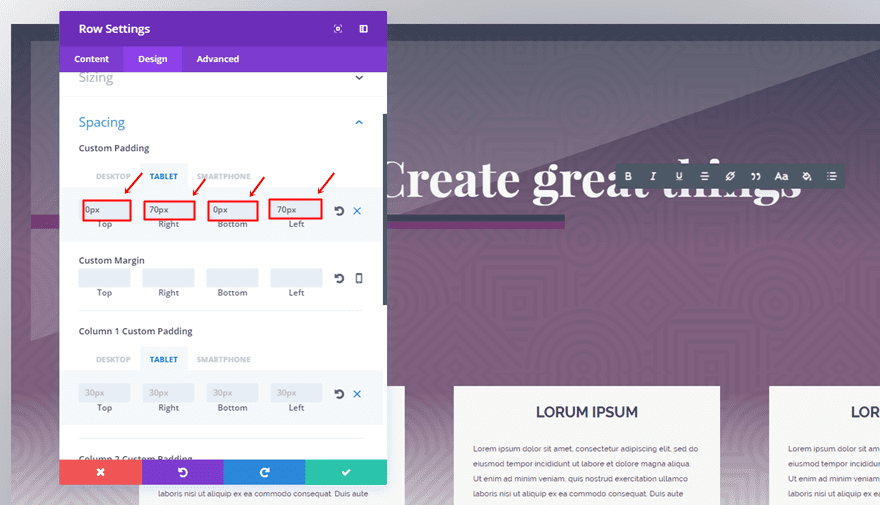
Spacing
Within the Spacing subcategory, start by assigning ’30px’ to the top, bottom, right and left padding of each column. Then, add the following padding to the Desktop version of your row:
- Top: 19px
- Right: 200px
- Left: 200px

The padding on tablets is slightly different:
- Top: 0px
- Right: 70px
- Bottom: 0px
- Left: 70px
And the padding on mobiles is the following:
- Top: 0px
- Right: 50px
- Bottom: 30px
- Left: 50px
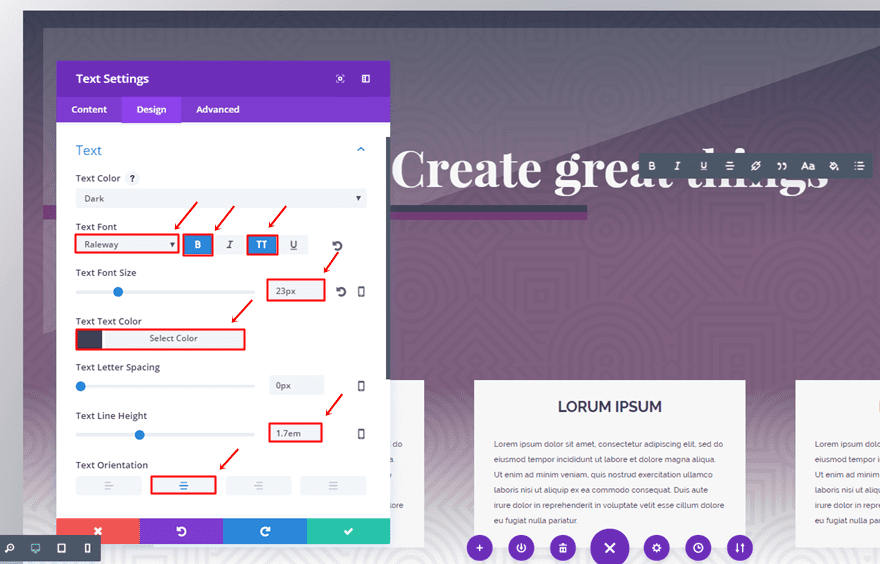
Add First Text Module
Continue by adding a Text Module to the first column of the row. Then, use the following settings for the Text subcategory of the Design tab:
- Text Font: Raleway
- Font Style: Bold & Uppercase
- Text Font Size: 23px
- Text Color: #3d4156
- Text Line Height: 1.7em
- Text Orientation: Center
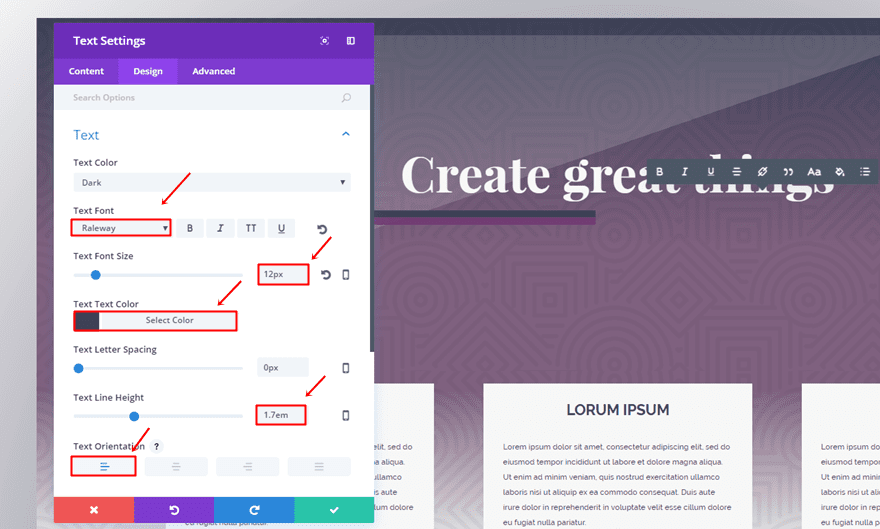
Add Second Text Module
Add another Text Module right below the previous one and use the following settings instead:
- Text Font: Raleway
- Text Font Size: 12px
- Text Color: #3d4156
- Text Line Height: 1.7em
- Text Orientation: Left
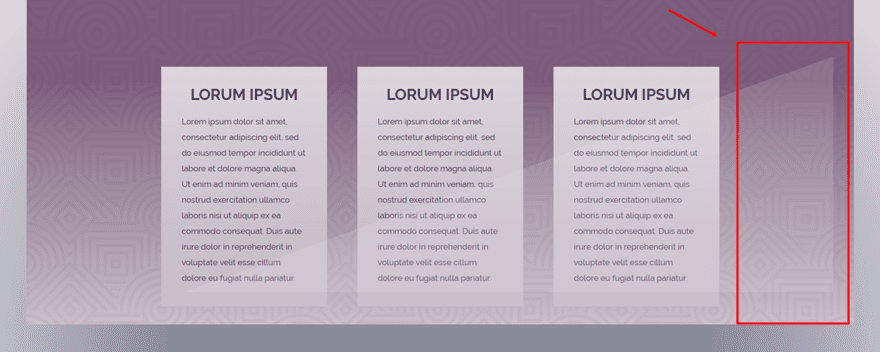
Clone Text Modules & Place in Other Columns
Once you’ve created the two text modules, clone them and place them in the two remaining columns as well.
Add One-Column Row
The last column we’re going to add is one we’re going to overlap with the previous one. The reason why we’re doing this is that this way we can combine different gradient backgrounds. Although the three rows we’re creating are separate, they’ll feel like they’re one. In the meantime, we are also able to enjoy multiple gradient backgrounds instead of just one.
Row & Column Settings
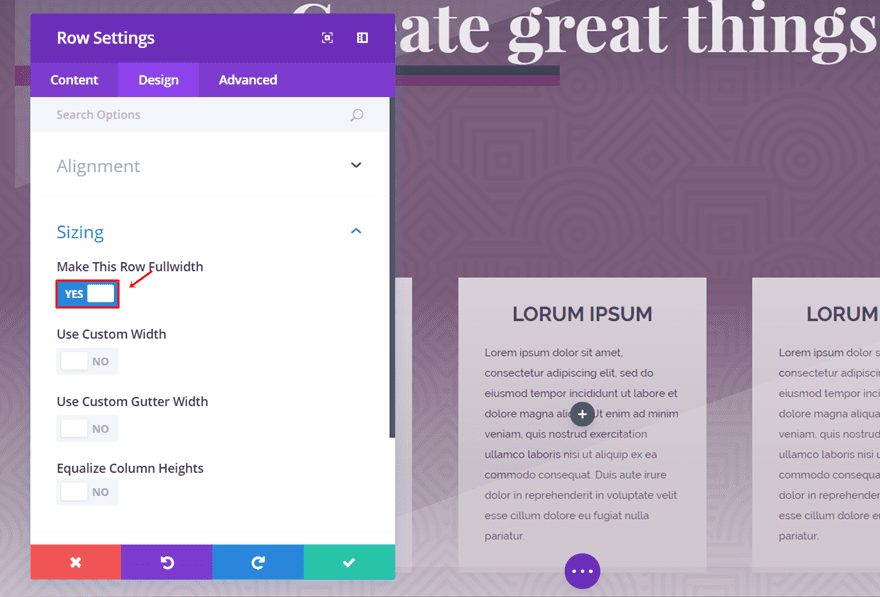
Make Row Fullwidth
For the last row, we’ll need to enable the ‘Make This Row Fullwidth’ as well.
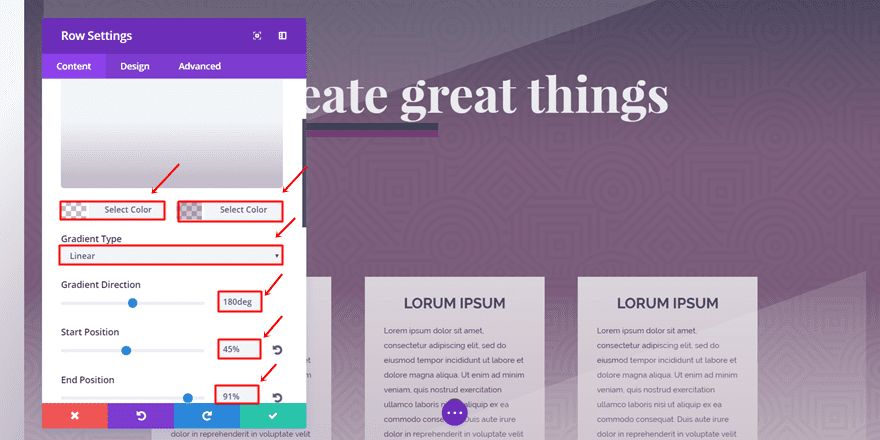
Row Background Settings
Then, add a gradient background to the row:
- First Color: rgba(61,65,86,0)
- Second Color: rgba(114,81,114,0.34)
- Gradient Type: Linear
- Gradient Direction: 180deg
- Start Position: 45%
- End Position: 91%
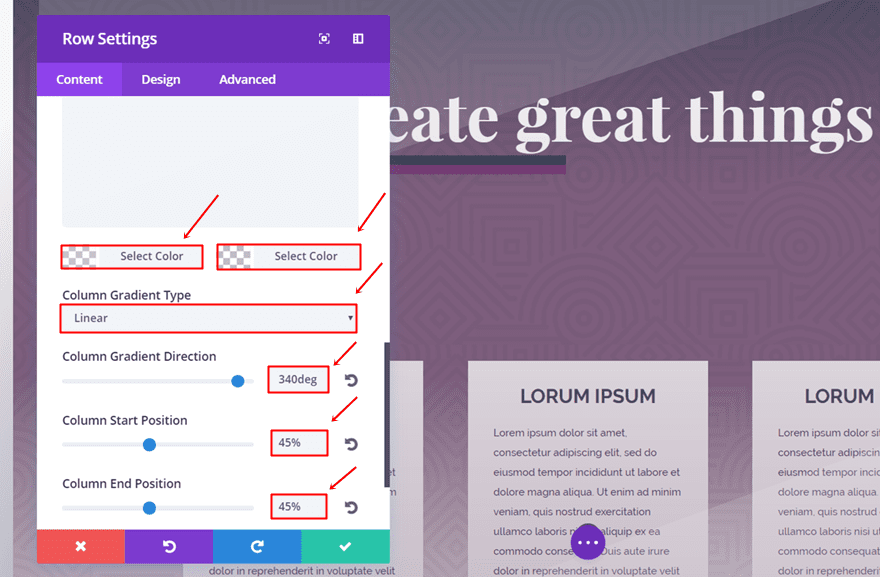
Column Background Settings
Scroll down the same tab and use the following gradient background for the column:
- First Color: rgba(239,239,239,0.15)
- Second Color: rgba(214,44,104,0)
- Column Gradient Type: Linear
- Column Gradient Direction: 340deg
- Column Start Position: 45%
- Column End Position: 45%
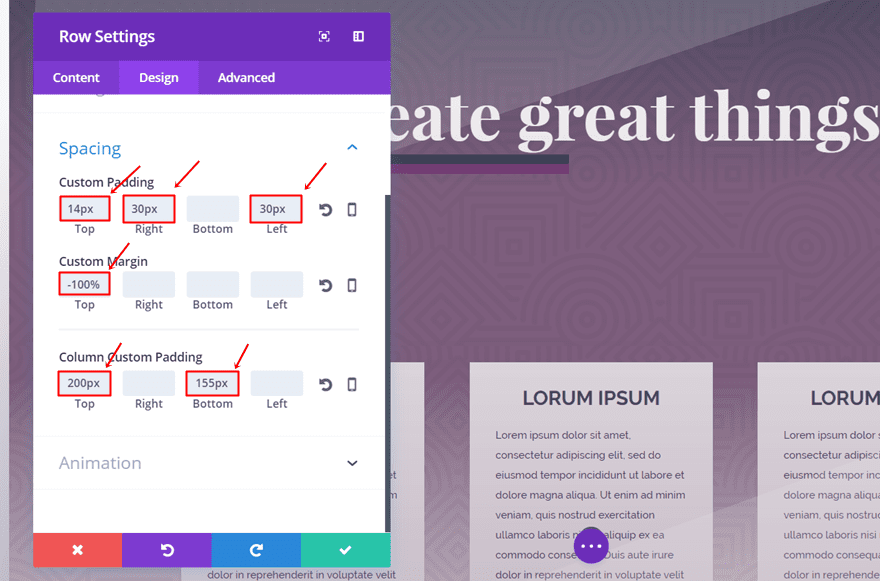
Spacing
The last thing we’ll need to do is add some padding and margin. Start by adding ‘-100%’ to the top margin and continue by using the following Custom Padding:
- Top: 14px
- Right: 30px
- Left: 30px
The column will need some padding as well; ‘200px’ for the top and ‘155px’ for the bottom.
Result
If you’ve followed the different steps that we’ve provided within this post, you should’ve been able to achieve the following result:
Final Thoughts
With the new Divi options, a lot of new things are possible. One of those things is combining backgrounds of rows and columns to achieve a great design. If you have any questions or suggestions, make sure you leave a comment in the comment section below!
Be sure to subscribe to our email newsletter and YouTube channel so that you never miss a big announcement, useful tip, or Divi freebie!
Featured Image by medejaja / shutterstock.com
https://www.elegantthemes.com/blog/divi-resources/how-to-creatively-combine-row-column-backgrounds-with-divis-new-options