
Divi and its built-in options allow you to create endless stunning and unique designs. Whatever type of website you might be building, you can adjust the settings to meet your website’s and visitors’ needs seamlessly. In this post, in particular, we’re going to show you how to make use of the new opacity filter to achieve a beautiful team section for your next project or own website. To bring this tutorial to a good end, you will be needing the following:
- A subtle background image that will be part of your entire row(s)
- Team member pictures that have a subtle background, a width of ‘800px’ and a height of ‘455px’
Result
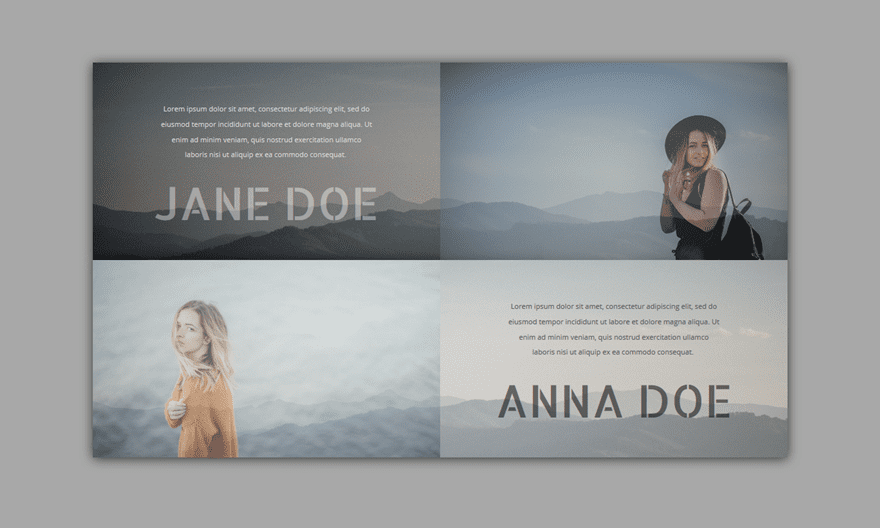
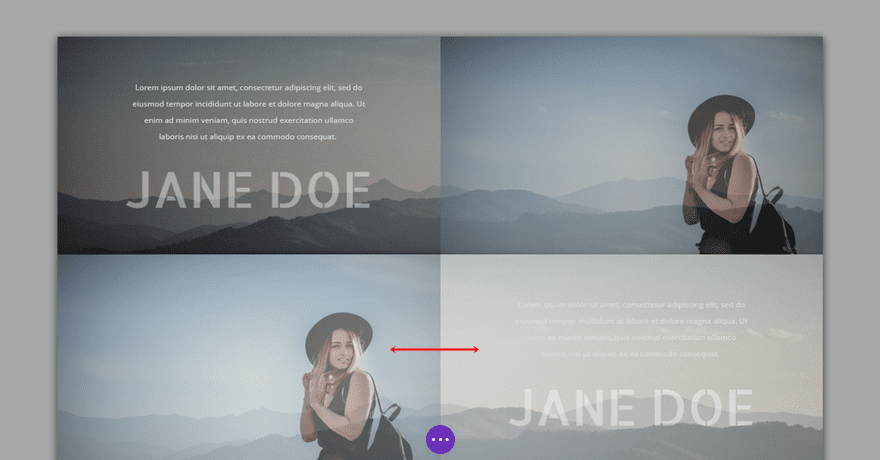
Before we dive into the tutorial, let’s take a look at the example we’ll be showing you how to recreate, step by step.
On Desktop
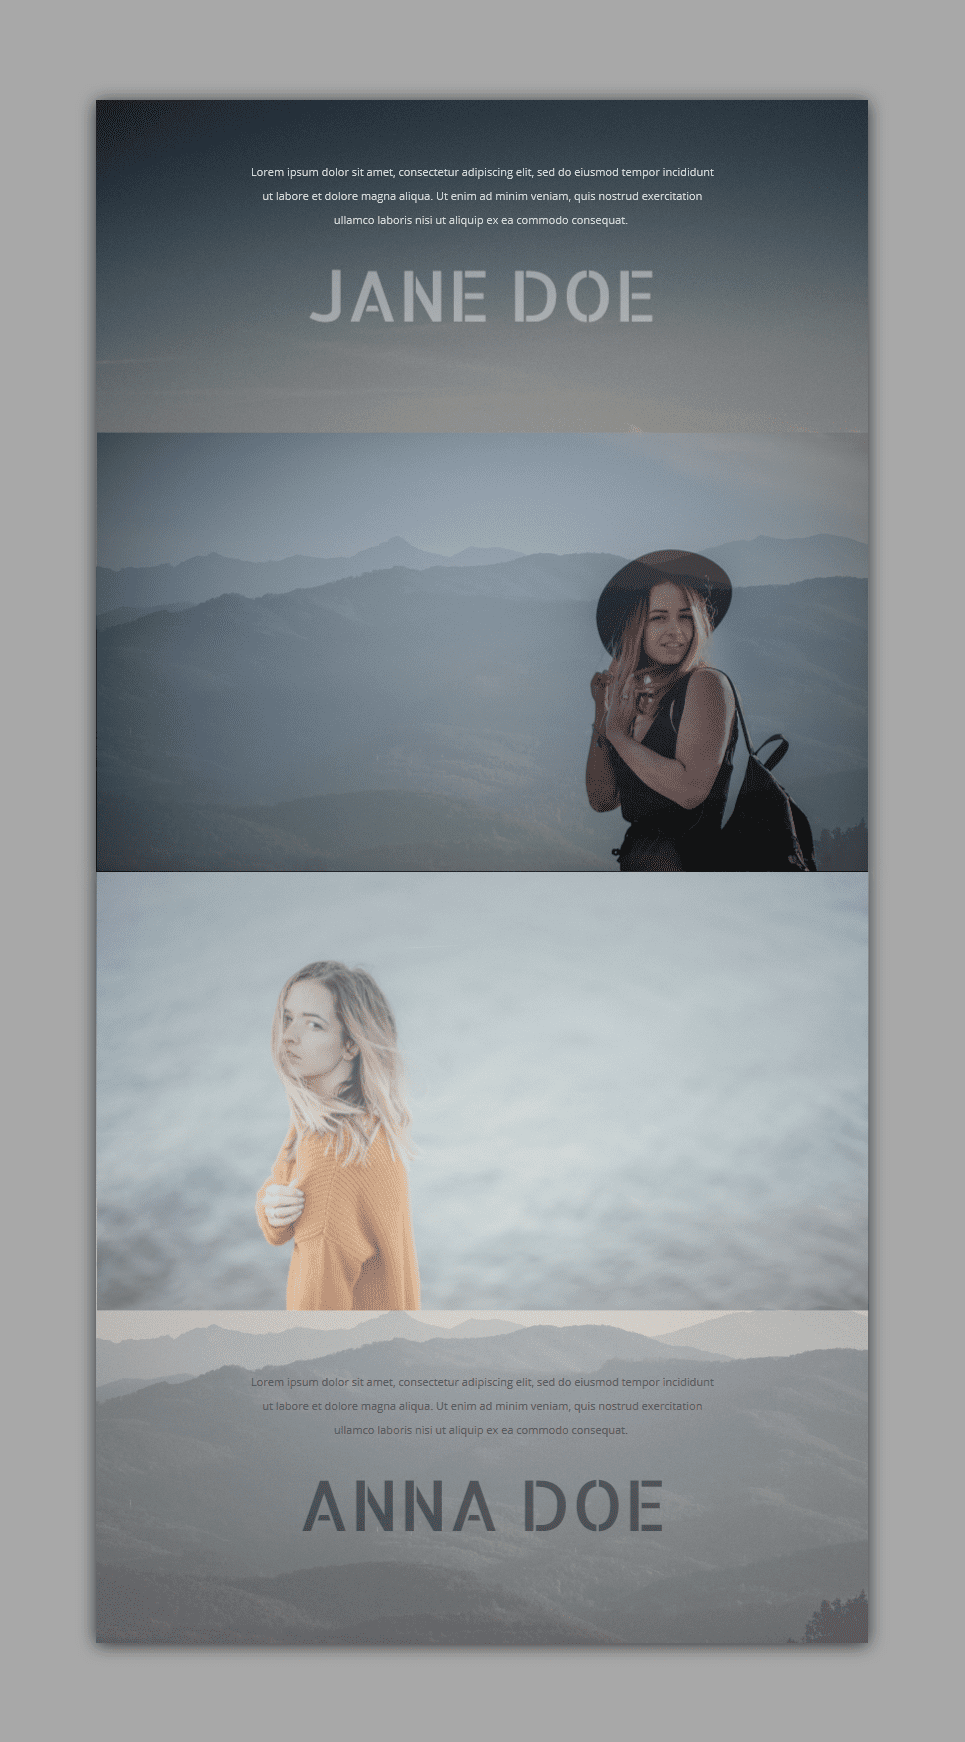
On Tablet
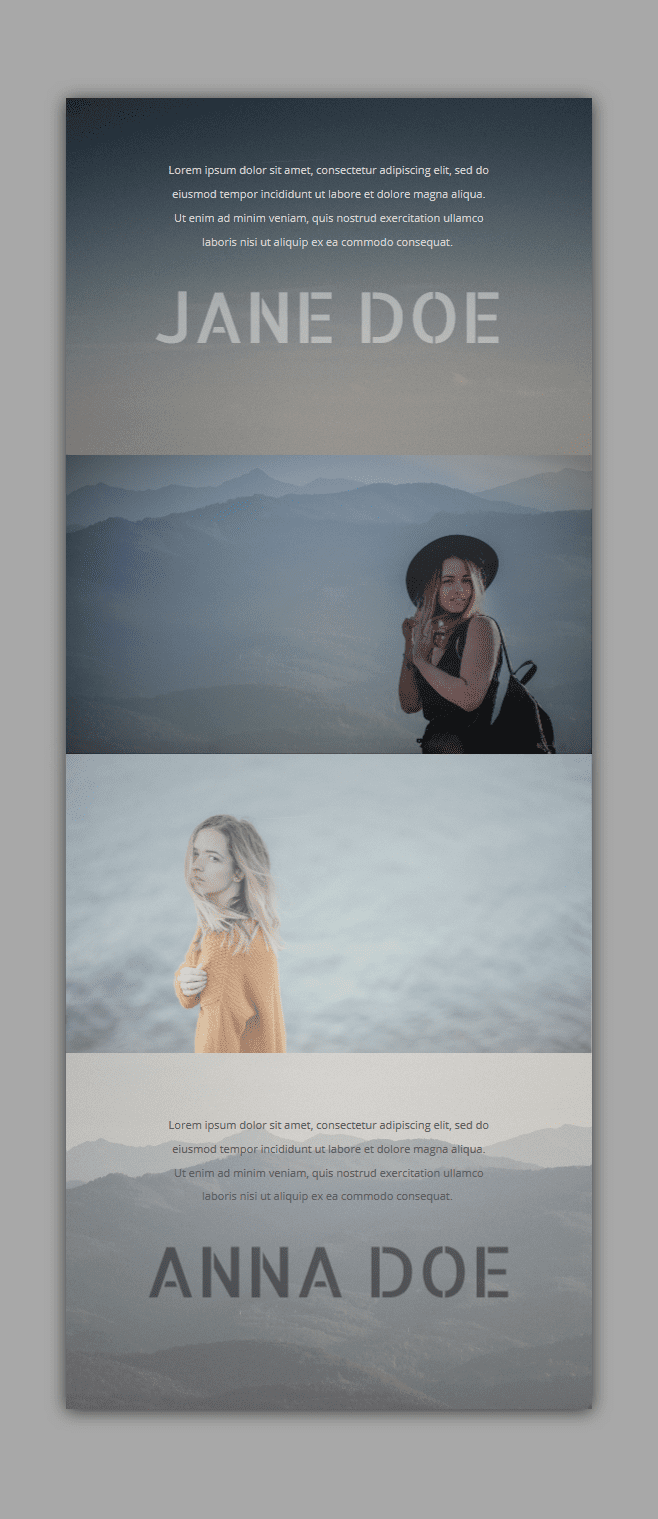
On Mobile
Add a Standard Section
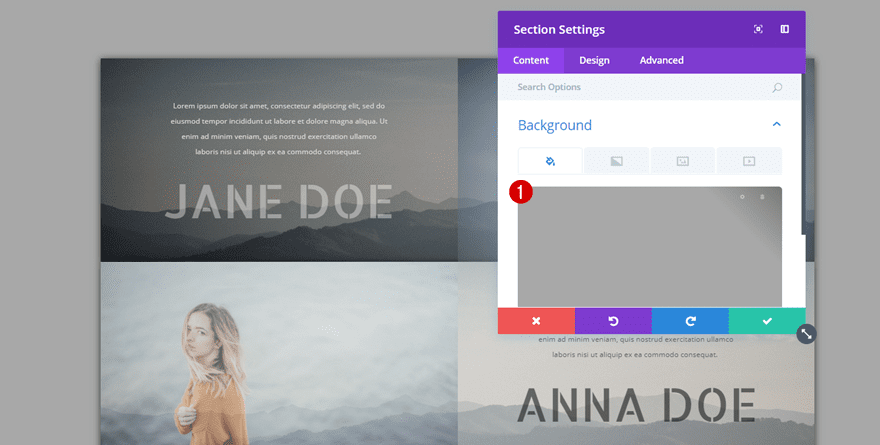
Background Color
The first thing you’ll need to do is add a new standard section to an existing or new page. Once you’ve added the new section, change the background color into ‘#a8a8a8’ or any other color of choice within the Background subcategory.
Spacing
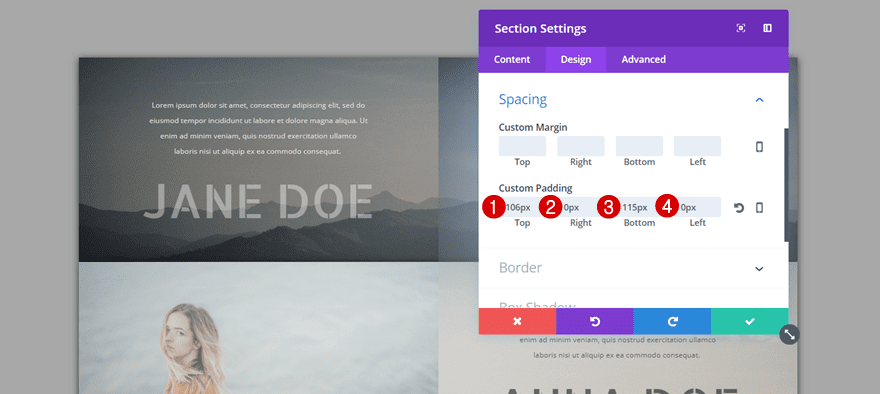
Then, move on to the Design tab of your section and add the following custom padding to the Spacing subcategory:
- Top: 115px
- Right: 0px
- Bottom: 115px
- Left: 0px
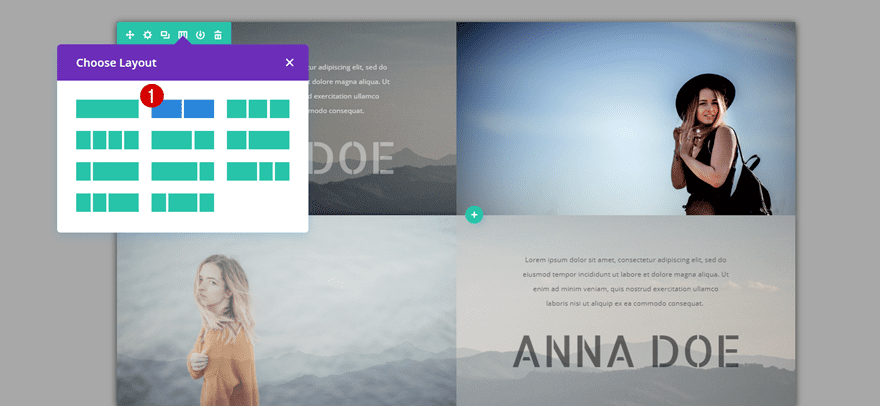
Add Row
Column Structure
Continue by adding a new row with two equal columns to your section.
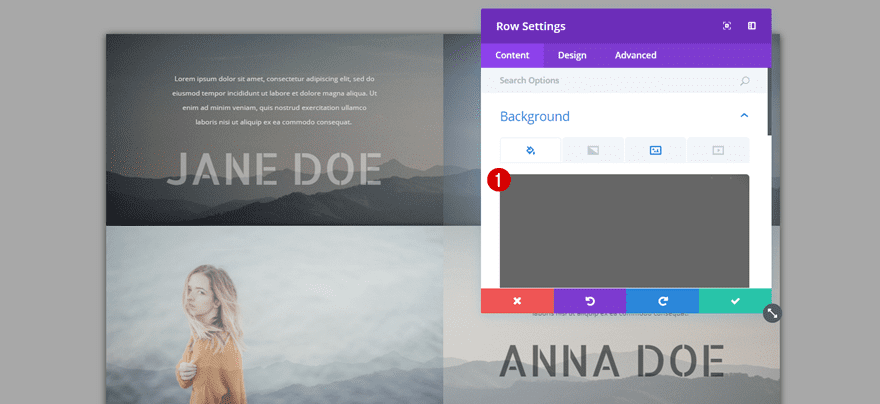
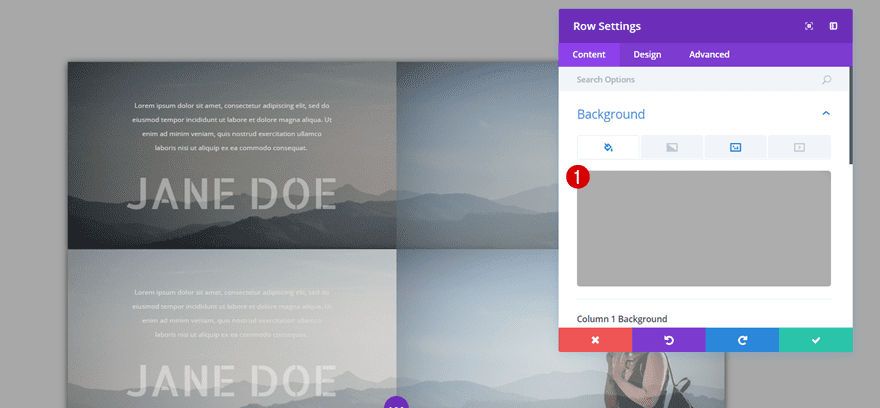
Background Color
Open the row settings and choose ‘#666666’ as the row background color.
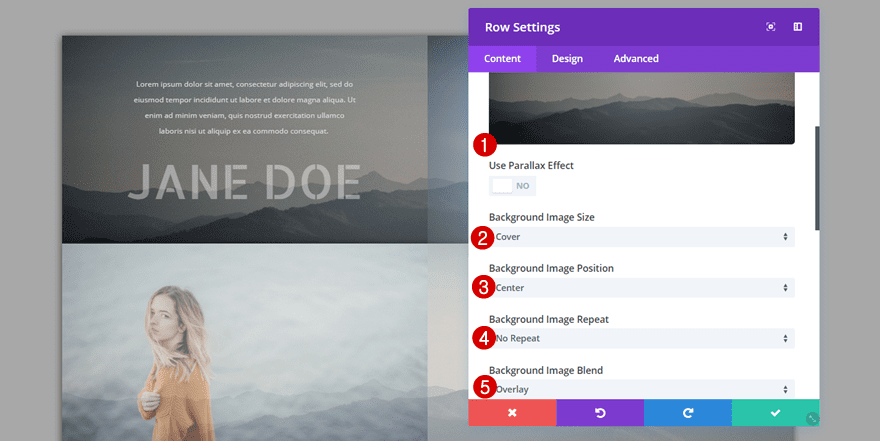
Background Image
Then, add a subtle gradient background and apply the following settings:
- Background Image Size: Cover
- Background Image Position: Center
- Background Image Repeat: No Repeat
- Background Image Blend: Overlay
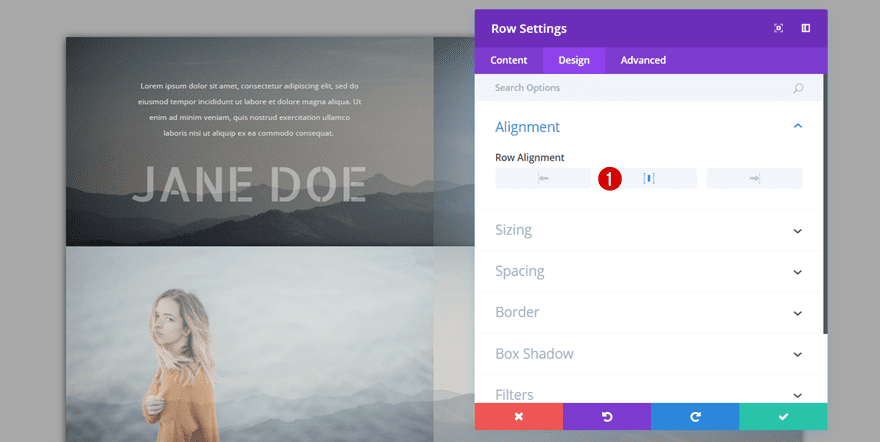
Alignment
Move on to the Design tab and use a center Row Alignment next.
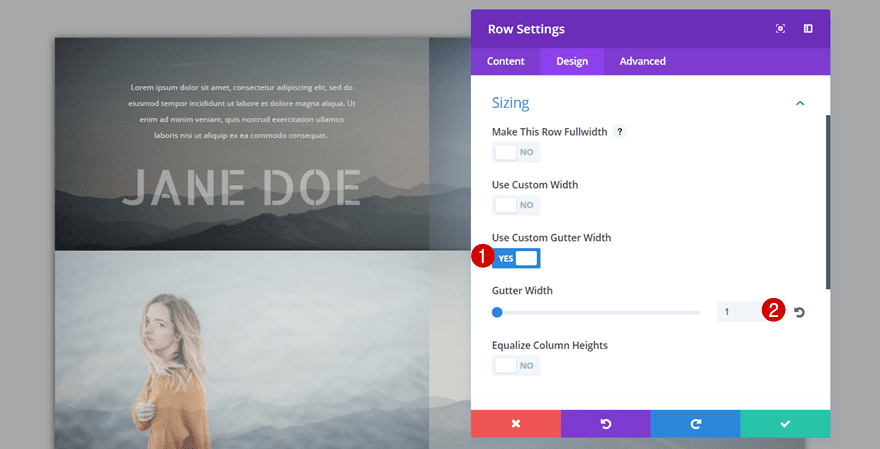
Sizing
Then, open the Sizing subcategory, enable Custom Gutter Width and use a value of ‘1’ for your row’s Gutter Width.
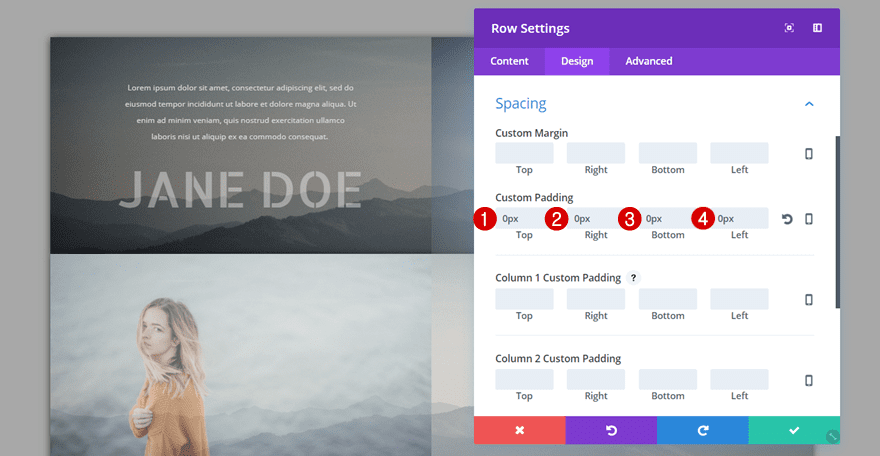
Spacing
Next, move on to the Spacing subcategory and make sure all the padding options are set to ‘0px’. This will ensure that, once you clone the row further down this post, you won’t have any space between your rows.
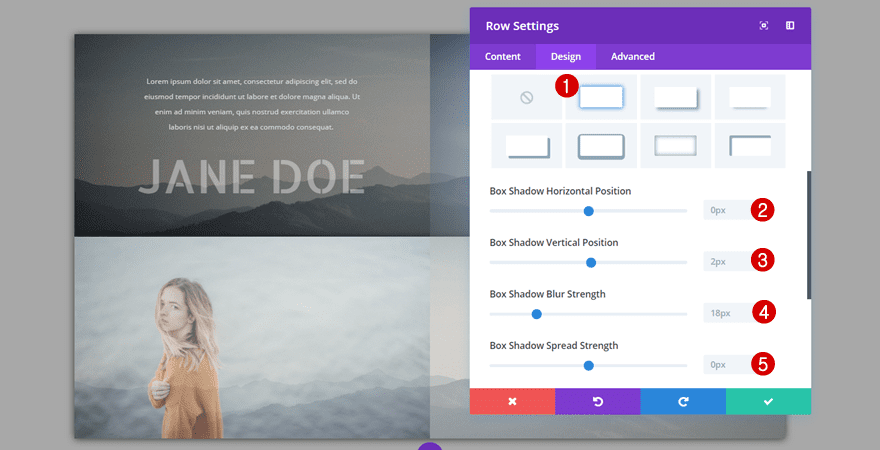
Box Shadow
Last but not least, add the following box shadow to your row:
- Box Shadow Horizontal Position: 0px
- Box Shadow Vertical Position: 2px
- Box Shadow Blur Strength: 18px
- Box Shadow Spread Strength: 0px
- Shadow Color: rgba(0,0,0,0.71)
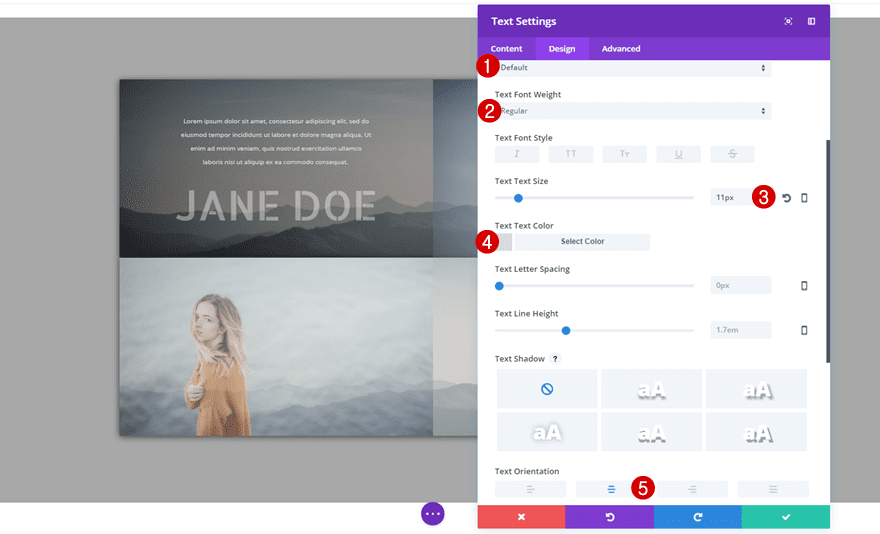
First Text Module
Text Settings
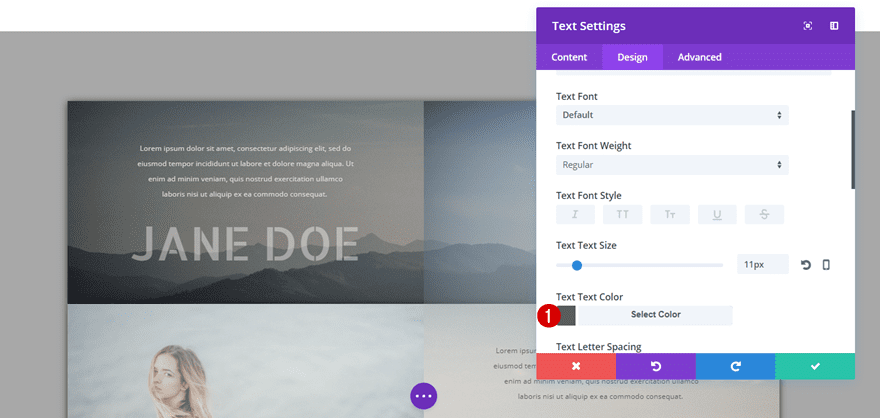
Once you’re done with your row settings, you can start adding the various modules to both columns. Start off by adding a Text Module to the first column with the following text settings:
- Text Font: Default
- Text Font Weight: Regular
- Text Size: 11px
- Text Color: #dbdbdb
- Text Orientation: Center
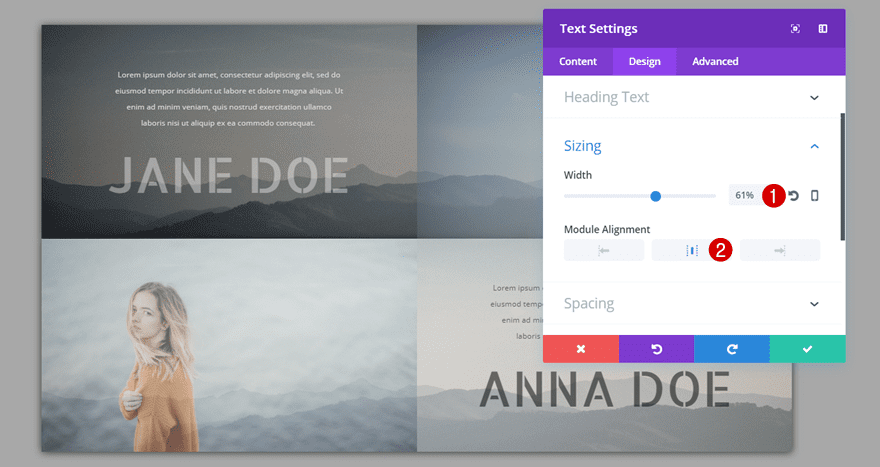
Sizing
Then, open the Sizing subcategory and make the following changes:
- Width: 61%
- Module Alignment: Center
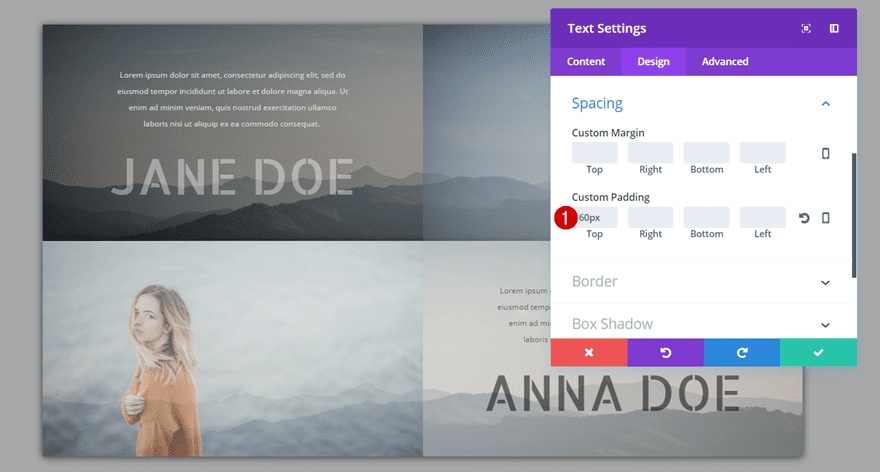
Spacing
Lastly, add a top padding of ’60px’ to the Spacing subcategory.
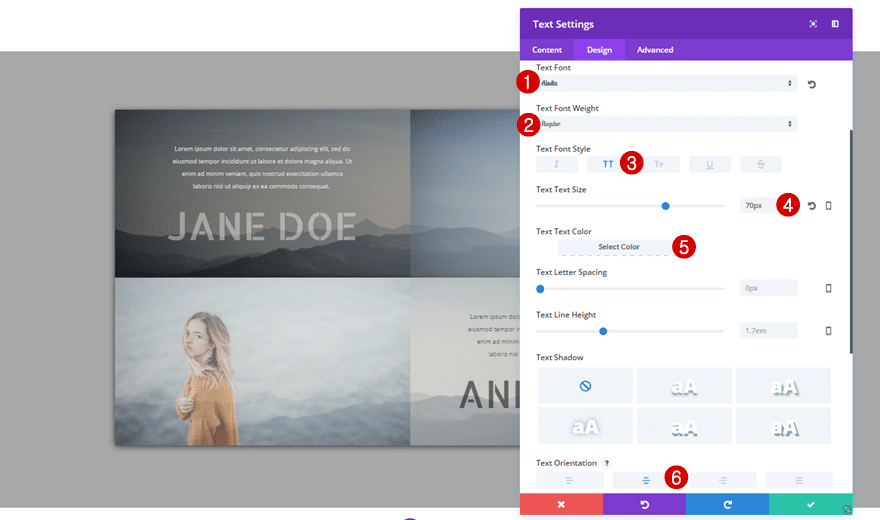
Second Text Module
Text Settings
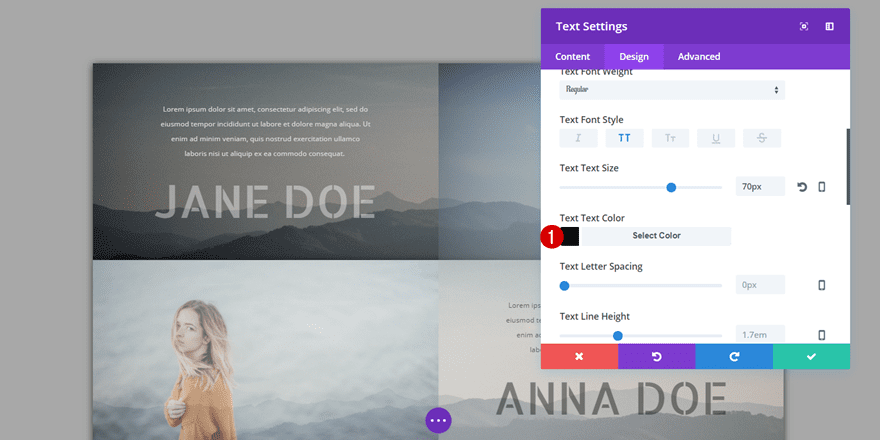
Right below the previous Text Module you’ve created, add another Text Module with the following text settings:
- Text Font: Aladin
- Text Font Weight: Regular
- Text Size: 70px
- Text Color: #FFFFFF
- Text Orientation: Center
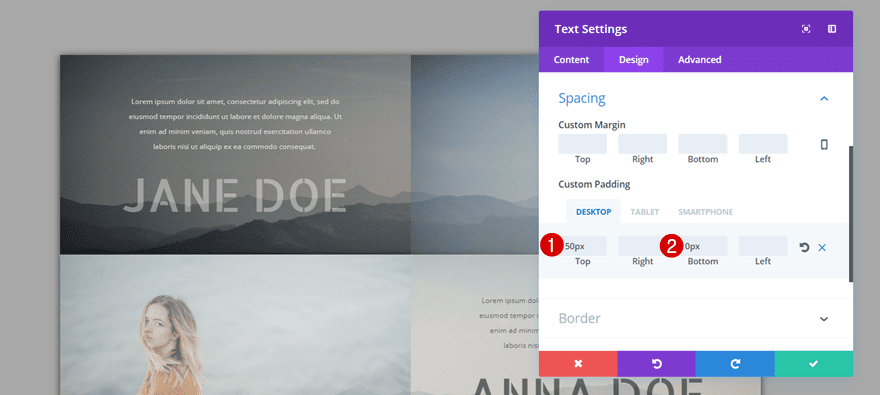
Spacing
Move on to the Spacing subcategory and use the following custom padding as well:
- Top: 50px
- Bottom: 0px (Desktop), 120px (Tablet & Phone)
Filters
Last but not least, change the opacity filter option in the Filter subcategory to ‘40%’ to make your row background and Image Module melt together.
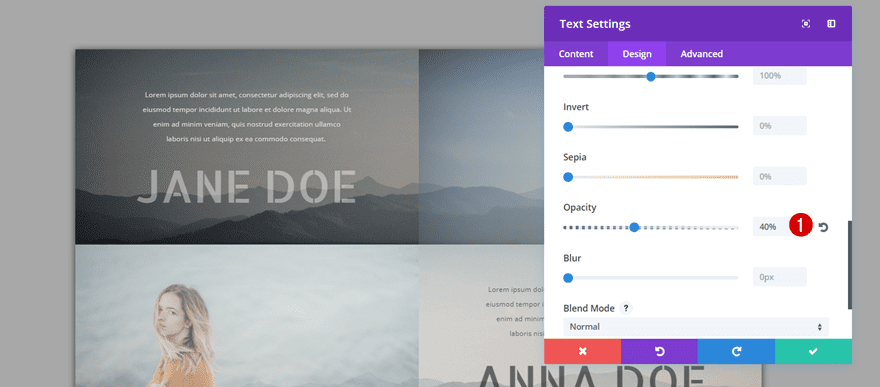
Image Module
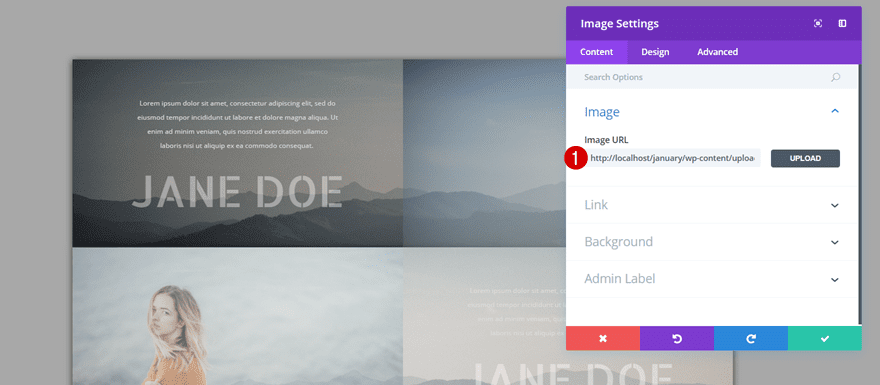
Image Dimensions
As mentioned in the intro of this post, we’ll be using specific image dimensions for the team member images that are part of this tutorial. To achieve the exact same result, use a width of ‘800px’ and a height of ‘455px’. Go ahead, add an Image Module to the second column and upload an image of one of your team members.
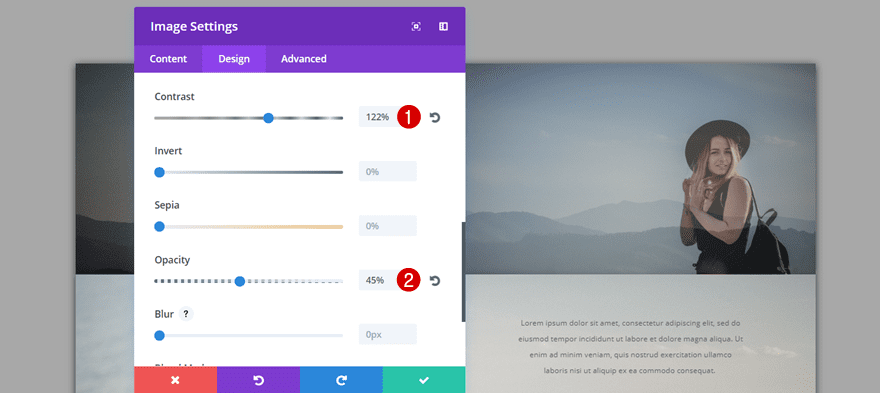
Filters
Then, move on to the Design tab and open the Filters subcategory. Play around with the different options you have until you achieve a desired result. In this example, we’ve made the following changes to the Image Module:
- Contrast: 122%
- Opacity: 45%
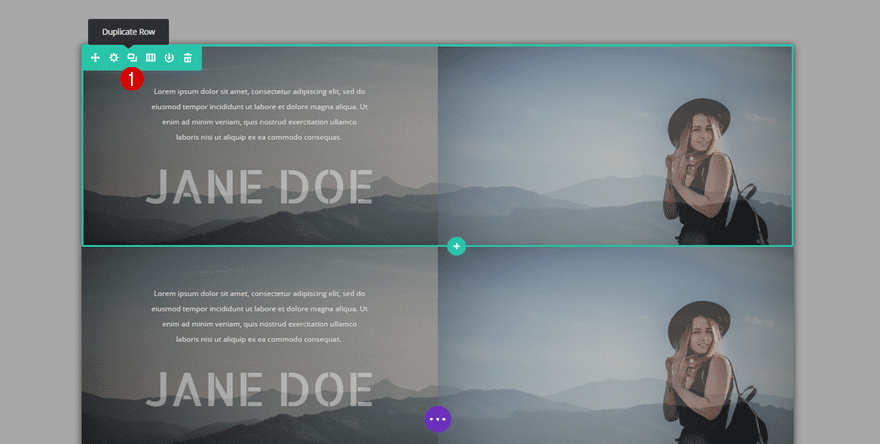
Clone Row
Now, once you’ve finished a row entirely, you can clone it to create the second version of the row.
Change Background Color
The first thing of the cloned row we’ll change is the background color. We’re choosing a slightly lighter background overlay color, ‘#adadad’, to make the rows somewhat different from each other.
Change Position of Modules
We’re also going to change the position of our modules. Place your Image Module in the first column and both Text Modules in the second column.
Change Image
Then, change the image your using for your Image Module. Make sure this image has the same dimensions as your previous image (preferably a width of ‘800px’ and a height of ‘455px’.
Change First Text Module
Since we’re using a lighter background overlay for this row, we’ll need to use a darker text color as well so the text remains readable. Change the color of the first Text Module to ‘#5b5b5b’.
Change Second Text Module
The second Text Module needs a darker as well, change it to ‘#000000’. We’re using the darkest color there is to make sure our text is still readable after adding the opacity filter.
Clone Rows as Many Times as Needed
You can now clone both rows as many times as needed to match with the number of team members you want to showcase on your page. The custom padding we’ve added to the row settings will make sure that, no matter how many similar rows you use, it will still look like an entity.
Result
Let’s take a final look at the example we’ve shown you how to recreate in this post.
On Desktop
On Tablet
On Mobile
Final Thoughts
In this post, we’ve shown you how to use Divi’s new opacity filter option to create a stunning team section for your next project or own website. The example we’ve shown you how to recreate has a great balance between written content and visuality. If you have any questions or suggestions; make sure you leave a comment in the comment section below!